Create load test for REST-service in SoapUI


SoapUI is one of the most popular (the nearest competitor is Postman) tool for REST services testing. As it follows from the tool’s name, it was originally intended to test Web Services which act using SOAP protocol. However the tool we’re going to use also fits the tasks which require interaction and testing the services which implement REST architectural style. The latter is what we’re going to discuss in this article.
The capabilities of SoapUI in performance testing aspect are poor enough. For the comprehensive testing it misses flow control features like branching the execution of steps depending on logical conditions. However you can still use it in order to verify in what range does you application comply the essential requirements of the response time and response content. For other things JMeter is better choice.
So we’re ready to start. There is a small question still to address. What are we going to test eventually?
Example description
In my example we’re going to create our own REST-service. It will have three endpoints. First would always return correct result. The second would return a failure in one half of total number of invocations (for the cases of failures we’ll be throwing errors intentionally). The third - in one third of the invocations.
For that specially prepared service we’ll create SoapUI project where we’ll implement functional tests for our API and later we’ll integrate those tests into our load scenario.
Implementing REST-service
We will write our service in Python language with the help of Flask library. Such the choice was made because of its simplicity, high speed and overall code representativity. However if you never worked with Python you will likely have to perform a set of simple steps to configure everything.
-
Download and install Python version for your OS. If you use Linux, then, probably, you have Python already installed. You can test it with
pythoncommand. If you have either Debian or Ubuntu, then probably you will have to install Python package managerpip. You would be able to do that withsudo apt install python-pipcommand. -
Install Flask with
pip install -U flaskcommand.
After you have completed prerequisite steps you can proceed with the example service code. Just copypaste it to some file on your hard drive (e.g. - demoservice.py).
from flask import Flask
from flask import Response
from random import choice

app = Flask(__name__)

luck = "You're lucky now.."
bad_luck = "Bad luck.."

@app.route('/')
def wec():
  return 'WebElement.click!'

@app.route('/half_error')
def half_error():
  if choice([True, False]):
    return Response(bad_luck, status=500)
  else:
    return Response(luck, status=200)

@app.route('/third_error')
def third_error():
  if choice([True, False, False]):
    return Response(bad_luck, status=500)
  else:
    return Response(luck, status=200)


if __name__ == '__main__':
  app.run(host='0.0.0.0', port='9090')
If you saved the code to demoservice.py then you can now run the service using the command python demoservice.py
The service code looks self-descriptive. However I’m going to provide some comments to the most remarkable parts.
-
if choice([True, False])andif choice([True, False, False])- such construction is used to pick a random boolean value with certain probability. In the first case we will pick aTruewith 1/2 probability. In the second case we’ll pickTruewith 1/3 probability. -
app.run(host='0.0.0.0', port='9090')means that we allow all the hosts from the network to connect to our service and that service is going to be bound to port9090
Create SoapUI project
Before we start it is worth noting that I’m going to use SoapUI tool of version 5.5.0 built for Linux OS. However my example will be valid for other builds as well.
When you create and debug/test your SoapUI project I would recommend to keep our demo service running.
Okay. Let’s open SoapUI tool and click "REST" (create new REST project). In URL field specify our base endpoint and don’t forget to specify the port number so that the entire value would be http://localhost:9090/.
Once you have created the project, rename it to some meaningful (e.g. WebElement.Click) and save it to your hard drive. By that moment you’ll be having GET request generated for our base address of our demo service (that will never return failure).
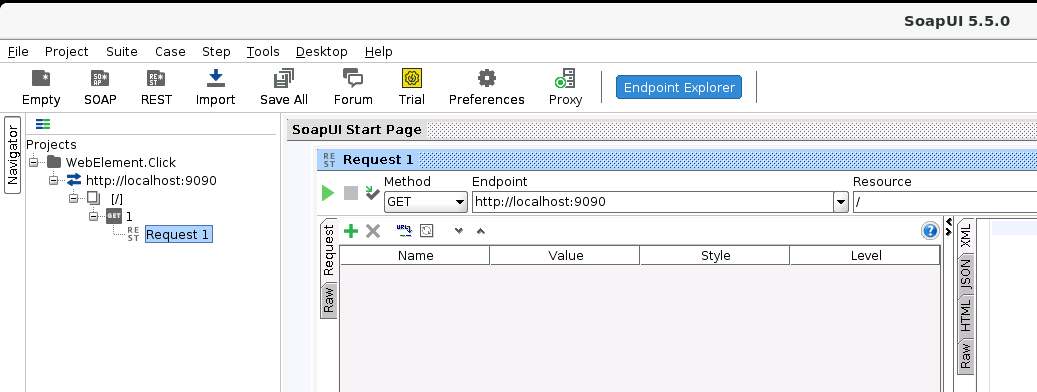
If you have your demo service running by this moment you can execute the request in SoapUI and ensure that you get correct response from the service.
Add two remaining resources. Do a right-click on service node (right under the name of our project) and choose New Resource. For the first case add resource /half_error, for the second - resource /third_error. Each of our resources will include the instance of GET request, which are generated by default. We’re going to use them further on. Check that the requests are working by manual request execution. I recommend to verify response using raw tab so that you could see both the response body and status.
Add test steps
Before we build up our load test we need to define functional scenario that we will use later as the basis for load script. Perform the following sequence of steps:
-
Right-click on the project node and select
New TestSuite. Specify some meaningful name for our test suite. For example -WebElement.Click Test Suite. -
Right-click again but now on just created test suite node and choose
New TestCase. Set some name (e.g.WEC Load Scenario) for that new node. -
Expand that just created test case node. It should contain several categories. One of those categories should be
Test Steps. Drag-n-drop generated requests (those ones which were generated when we were adding resources to our project) toTest Stepscategory one by one. When drop each request to the steps SoapUI will offer you to name your steps. I recommend to name your steps in the following way: first step that gets/resource name asAlways get OK, step for resource/half_errorname asGet OK at half time, step for the resource/third_errorname asGet OK at two third times. -
At this point our steps do not assert the service responses. However if we are talking about testing, one of the mandatory attribute of a test is the result assertion. This is why we doubleclick step node (step is getting open for edit) and look for the "Assertions" work at the bottom of just opened model window. If you click that word, you will open the section responsible for managing step result assertions. Click "+", that is located at the top of the assertion section. At the left-hand pane of the opened dialog choose "Compliance, Status and Standards" and at the right-hand pane then choose "Valid HTTP status codes". Then click "Add". In the field of valid statuses input "200" and click [OK]. Repeat the step for all the steps in out test.
-
[Optional step] As the last point we need to sort all the steps by the probability of error appearance (this optional step will allow us to increase test result representativity). The fact is that each step (each resource in our demo service) implies failure response with certain probability. The first one with zero probability, the second - with 0.5 probability and the third one with
0.333probability. Also when SoapUI tool gets failure response on certain step it stops performing remaining steps of the test and mark test as failed. Thus lets sort (you can use Ctrl+Up/Down to move steps vertically) our steps in the following way:-
Always get OK -
Get OK at half time -
Get OK at two third times
-
At this point we have our functional test ready. We can open test execution window with double-click "Test Steps" node and try to execute it several times.
Create load test
All that is remained to do now is to add and instance of load test with load configuration and assertions of the relevant metrics of responses. Right-click Load Test node and select New LoadTest. Name that new node with some relevant name like Simple Load Test.
You should see a small modal window of your new load test that at the same time is test result window. The order of the step is the same as you have set in Test Steps node. If you will change step order in load test window it will also be changed in test steps automatically.
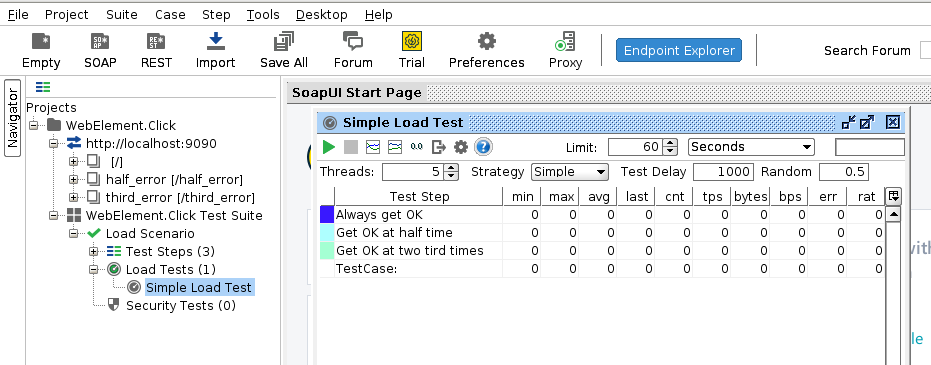
Lets keep the load configuration that is set by default (you can read about load configuration in more details in SoapUI official documentation) and run our test. Pay attention to the value in cnt field of the very first step. It shows the total number of runs which SoapUI performed according to the current configuration of our load test. First step of our test didn’t encounter any functional error (what is actually correspond to our expectations) for all the executed instances of the test. That is why we can see the same cnt value for the second step of the test.
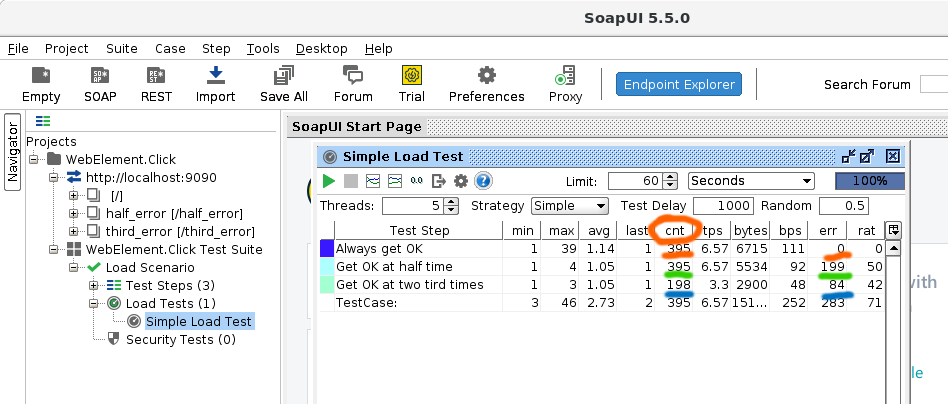
Values in err columns look expected for all test steps. For the first step it is zero, for the second step - approximately a half of cnt value of first/second step, and the third step holds one third of third step’s cnt.
Test quantitative characteristics of test step responses
The errors that we were talking about before were so called functional errors. It means that in a real world the server would fail to execute some business logic and it would replied with something that we treat as unsuccessful result. In load tests SoapUI tool can verify the number of failed responses, the time of responses and some other characteristics for if they match expected ranges.
In load test configuration window look for "LoadTest Assertions" button at the bottom. Click it and then click green "+" button in the top part of opened section. Select "Max Errors" and click [OK].
You can find more details on which types of load assertions SoapUI tool supports in the SoapUI official documentation. In our example we’re going to use the metric "Maximum errors at the step". The target value for that metric can be provided as in absolute (number of errors) as in relative (what is the part of errors in the total number of executions) manner. Let’s take our step that is to "fail" each second time as an example and set the value
0.5as the target metric value (the metric is re-calculated on each execution so that if it reaches 0.5 the test will fail).
Input the following values: 0.5 to the field Max Relative Errors and 2500 to the field Max Absolute Errors. Save the changes. Also for the sake of demonstration lets change the configuration of our load test a little. Set 5000 for Limit field and choose Total Runs in the dropdown that is next to Limit field. Let’s run it and watch the result.
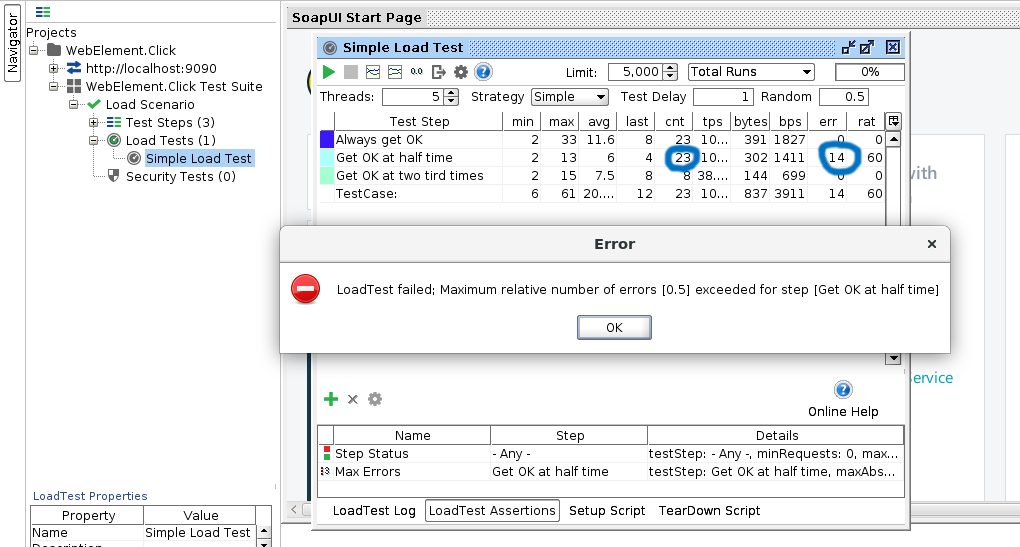
As we can make sure the test failed not reaching it’s expected end as soon as the part of failed "second" steps hit the half of total executed "second" steps by the moment of test failure.
So. We have learned how to create, configure and execute load tests in SoapUI. Moreover the example of our demo service written in Python language also looks pretty useful and valuable and can find its application in the day-to-day testers life (for example when you need to mock something in your test environment). In this article I covered the most part of SoapUI capabilities in load testing area, however I didn’t cover such topics as using groovy-scripts and describing different load strategies that the tool supports. All that helps to make your tests more flexible but also makes the article a bit overwhelmed. I’ll touch mentioned topics in next posts.
If you still have the questions please send them to me using this form. I will amend the article according to your feedback.